Tuesday, September 18, 2012

Vistaprint -It's a Love/Hate Relationship (so far)

So I kept seeing all of these awesome products that teachers were getting for their classrooms from Vistaprint for AMAZING deals and thought to myself, I HAVE to get in on this. So I scoured the internet until I found a Groupon for Vistaprint. If you paid $17 you got a $70 voucher for Vistaprint - not a bad deal I thought... to sweeten the deal even more since I had never purchased anything on Groupon before I got a first time buyers coupon that saved me $15. SO in the end my Vistaprint voucher cost me $2. The fine print said that if I didn't use my $70 voucher by December I would still get $17 to spend on Vistaprint products... so for $2 I thought I made out pretty good! THEN I tried to order product. OY VEY!

I got a great email that offered me tons of free products, little did I know that if I wanted all those products for free I couldn't use my $70 voucher - NO WAY! So then I sat down and figured out the what it would cost me for all the free products (and a few not free products) without my Groupon - with shipping I would have spent $40.70 - not that great of a deal I thought. Yes I saved over $100 but still, who wants to spend $40 on stuff? Then I redid my shopping cart and used my Groupon. First I spent almost exactly $70 and found that I would have had to pay $35 or more for shipping!?!?! Now that is CRAZY!!! So then I went back and got a few other things so I spent $25 addition to my $70 that were free and now shipping was free. Once tax and all that was done I ended up spending just about $30. So I'm not really sold on using Vistaprint so I thought I would be spending almost no money and spent $32  (counting my Groupon)!

BUT I am excited for all the stuff I got and can't wait to see how it looks.... of course I have to wait the 14 days to get it all which is a bit of a bummer since I am impatient and want all my stuff NOW! But here is what I got:

First up.... a new personalized pen! It was free so I thought, WHY NOT, plus I love the pattern its green and pink polka dots!

These are magnetic business cards. They were originally free with the email but not free with the Groupon offer. I did get them for about 50% off and since I needed to spend $70 I got them. I bought 25 and will hopefully give them out to the parents at our meet the teacher, that is if they arrive in time, otherwise I will be sending them home as a special treat!

These are simple folded cards. They just say my family's name on the front. I got 10 of them for $1.89. These were also a freebie originally but with the Groupon they were not. I also got 140 matching return address labels - they were originally free, but with the Groupon cost me $1.48.

I got 10 of these little note cards for free. 

These are small car magnets. Originally the one on the right was free, but with the Groupon it cost me $1.89. But I was offered another magnet for free so I got the one with the flower.

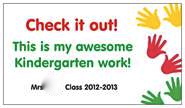
This is a small lawn sign. It was free but using my Groupon it cost me $2.23. I plan to hang it outside my door since I still don't have my name up outside my door. 

This stamp was free!

These are my "business" cards. I put all my teacher contact information on them and plan to hand them out to parents. I got 250 of them for free... figuring I have about 25 kids in my class each year these cards should last me 10 years! I didn't put my grade or room number so I could use them year after year!

These are probably my favorite item! I did pay for these because I purchased 50 of them and wanted it colored on the inside. I put a cute saying inside them and now I'm all set for when my kiddies bring in something special for me! I can't wait for these to come in! These were my most expensive purchase: $8.84!

These flat invitations were also free originally but with my Groupon they cost me $1.47.

The final thing I purchased were these rack cards. They were originally FREE but I had to pay $4.99 to have them printed in color on the back. BUT with my Groupon they cost me $3.78 in total... I know it makes no sense to me either! They were $2.83 for them and an additional $.95 to print them in color on the back. I think they look really cute and I hope they print as good as they look (mind you this picture is terrible!). They are the "Beanie Baby Reading Strategies." 

So in the end I purchased 13 items. I paid for 8 of them and got 5 of them for free. The original total was $137.89 minus all the discounts and my Groupon my total came out to $25.90. Shipping would have been another $22.18 but since I spent $25.90 shipping was free... then with tax my total came out to $29.95 instead of $163.76... I saved $134.17! I'm still not 100% sold on all of this since I still had to spend an additional $30 and I really thought I would get stuff for almost nothing, but I guess you really can't get anything in life for free these days! I'm excited for my stuff to come in and see if I love them as much as everyone else does. Navigating their site was pretty easy but they don't make it clear that some deals can't go together, BUT their customer service representatives were very helpful and patient with me. 

Have you gotten anything from Vistaprint? Do you love them? How do you use your Vistaprint items in your classroom?
Photobucket

Sunday, September 16, 2012

The First Week - Oh My!

I forgot how TIRED I would be after the first full week of school! It's really exhausting trying to get back into the swing of working and balancing my 3-year-old's schedule! BUT I survived! I got through the first week and now I have a long weekend to enjoy the holiday with my family and relax a little.

So how was your first week? I tried a few new things this year and I have to say they were AWESOME!! The first new thing I tried this year was A License to Glue from Krissy over at Mrs. Miner's Kindergarten Monkey Business. I LOVE IT!! The kids did such a good job. I've NEVER used liquid glue the first week of school let alone the second day of Kindergarten. The little poem and the activity sheets were awesome. The kids had such a good time with it. Now I only did one page with them because my time was limited, we skipped the page where they had to cut out the shapes and glue them onto one another, but even still... they seemed to REALLY get it! I did learn that because they put a GLOB of glue on their paper I could not use my art drying rack to dry them (the pages bent in half and the glue "poured" onto the floor, oooopppsss!)

The next new thing I did was I started using parts of Whole Brain Teaching... OK I'm not expert on WBT at all. I have watched a few video and read some blog posts but I liked what I saw and thought I'd try it out. Now I honestly only thought I was going to use the rules and the "class-yes" response. BUT I ended up introducing a few more aspects of WBT. I started with a great set of rules that I got from Michelle over at Inspired by Kindergarten. I LOVE these rules and so do my kids!! We made up hand movements to go with each rule, some of the movements I got from watching WBT videos and others I made up on my own. The kids are really starting to own the rules! I love her way of keeping track of how the kids are behaving using the rules, but I have not yet incorporated that into my room. Once we established the rules I introduced the "class-yes" response. It's taking a little while for me to get used to using this response, but it does seem to do the trick. Honestly I think I could have done any response but I like that this is short and quick. I often find myself attempting to grab my kids attention with other words and realize that they aren't listening, then I remember to use "class-yes" and poof their eyes are on me and they are listening! The next aspect I taught was "hands and eyes" I think this is the one they are having the hardest time with, but so am I. With our curriculum and how we teach its hard to figure out when to use this since I feel everything is important! BUT I'm sure we will work through this together. After teaching these few things I found myself teaching the scoreboard. I wasn't going to use the scoreboard but I'm loving it! The kids are getting it and on Thursday we had the best day ever!! They were so excited that they beat me. Because of WBT I'm find that I'm trying to talk less and get the kids to tell me what I want them to do. I'm also introducing some small hand movements for certain aspects of our day... Like I said, I'm not doing 100% WBT, I don't think that's possible in my class with our curriculum BUT I am using it in some ways and LOVING it!!

The last thing I want to share with you is a really cute patriotic project I did. *OK I CANNOT FIND THE LINK FOR WHERE I GOT THIS IDEA - SOOO IF THIS IS FROM YOU PLEASE LET ME KNOW SO I CAN GIVE YOU CREDIT!!!* I printed out a large heart onto computer paper. Then thanks to Krissy's great "License to Glue" activity my kids used liquid glue and glued pieces of red, white and blue tissue paper all over their paper hearts! Once they were done I covered them in more glue to seal the tissue paper. Once they dried I cut them out and used a small amount of oil on the backs of them to make them more see-through. I LOVE them!
This is a picture of what they looked like as they were drying BEFORE I cut them. I did learn a few things. Next time I wouldn't have the kids put dots of glue down to attach the tissue paper. I would have them (or myself) "paint" the paper with the liquid glue. I found that for the few kids I did this for, the tissue paper stuck better. It also made it easier for me to cover the tissue paper with glue at the end. I would also wait a little longer to put the glue on top so that the tissue paper didn't crinkle up as much. As for the oil - less is more... it seemed to take a long time to dry and it never really dried completely. But they are hanging up in my room so maybe after a four day "weekend" they will be dry! I'll get some pictures of the finished ones later this week.

Thanks for stopping by... I promise to post some more stuff soon!

Photobucket

Saturday, September 8, 2012

First Day of School and a Winner!

I did it! I survived my first two days... and not only did I survive but I LOVED them!! My class is sooo adorable and wonderful and all kinds of good that I'm super excited. I have a few students that I already knew... One of which is the little sister of a boy I had my very first year at my school! I remember when she was a teeny tiny itty bitty little baby sitting on her mommy's lap during conferences and now I have her in my class!!

I'm sure a lot of you know that no matter what you plan for those first few days of Kindergarten NOTHING seems to go the way you expect! That's pretty much what happened to me. First off one of the wonderful Paras in our building wasn't assigned a "home" yet so she joined my class and what a HUGE help she was... but since I had the extra set of hands I decided I had to revamp my plans for the first half day. Usually I do a lot of activities at the tables so I can collect and organize supplies... WELL with my wonderful helper I was able to teach and do fun things all day and she amazed me by collecting, labeling AND putting away ALL of the kids supplies! Every paper towel, baby wipe, baggie, folder, notebook, etc. was either placed in their spots in the closet or into the bins for the next day! It was AMAZING!!

I broke a few of my rules that first day and didn't teach my class rules or use any real behavior management system. I haven't done anything like that since my first year of teaching, BUT the difference this time was I did it intentionally and had a plan for the next day. My first year I didn't teach any of those things because I was very overwhelmed and didn't have a good plan. Instead on the first day of school I read Miss. Bindergarten Gets Ready for Kindergarten. I LOVE this book, and so did the kids. This year they really seemed to get that I had to set up the room just like Miss. Bindergarten did in the book. We did the name tag game I mentioned a few posts back - I don't think they came out that great and I ended up using traditional name tags the second day again. While the children worked on their name tags I began to work on their portfolios that I will be trying this year. I'm super excited about them. I purchased them on Teachers Pay Teachers at the end of last year from Katie Mense... you HAVE to check them out! (Click the title of the picture below to go to her store and see what I'm talking about!)
I only had them write their names on the September page... hey it was the first day and we only had a half day! I could only get some much done in one short day. My plan for Monday is to get the Alphabet writing done, ok started, and hopefully by Wednesday I can move on to the number writing page.

I decided against doing a full tour of the school on the first day. Instead I just took the kids in the hallway to see where the boys bathroom was. They did a great job learning where it was and the boys were able to go by themselves to the bathroom without myself or my lovely helper having to take them. I didn't have to show the girls where the bathroom is because the girls bathroom is in our room. At the back of my room is a bathroom that joins with the class next to me. It has 3 stalls and a sink... since it has three stalls and is shared with another room we couldn't have the boys and girls share the bathroom, that could have caused some major trouble!

We also did a mini math lesson... I introduced the calendar routine, our weather routine and counting the number of days in school. We added 1 straw to our ones, tens, hundreds pocket chart and the number 1 to our 100s chart. This year I am going to build the hundreds chart by adding one number each day until we get to 100. I like this because the children will be practicing counting different ways every day. With the hundreds chart we will be counting by ones every single day until we get to the 100th day of school. With the ones, tens, hundreds pocket chart we will be counting by tens and ones (after the 10th day of school of course!).

Towards the end of the day I had my wonderful helper read First Day Jitters and I took their first day pictures. I always take a picture on the first day of school, but this year I made a really cute bulletin board AND I had the kids write their names on small white boards. The pictures came out really cute.

 Isn't this a cute picture??? I love how this little one "wrote" her name! Every one of my kids wrote something on their boards whether it was letters, lines or dashes! Here is what the full board looks like without anyone in front of it.
I have a bunch of apples that I will be writing my kids names on this weekend and adding magnets to, YUP, this board is magnetic!!! I will probably take another picture of each kid without the board in front of them to use for my attendance cards. I am hoping to get some leaves, snowflakes, flowers and who knows what else to use to decorate this tree each month. I may and that's a BIG may put the number of days in school up there once a month and take a picture of each kid... its a good thought, but who knows if I'll remember to do it each month. I'm going to try really hard though! 

By the time we finished the book and taking pictures it was time to go home. The kids had a GREAT day and so did I!!! Now the only problem is how tired I am.... I have to get used to these crazy hours again! 

Before I go for the night I wanted to share the winner from my Clipboard giveaway! 
  
Entry #157Kerri S.
Congratulations Kerri! Let me know what theme/style clipboard you want!! 
Photobucket

Tuesday, September 4, 2012

Classroom Reveal (Sort Of...)

Today was our first official day back at work. I have to say the day went really smoothly and I got a lot done. I arrived at school about 2 hours before I had to be there (I wasn't sure how much time I would get to work on my room during the day). We had a full breakfast, I mean scrambled eggs, hash browns,  fruit salad, rolls, juice and coffee! It was delicious! What a way to start the school year. After a lovely breakfast we had about 2.5 hours of meetings and then we broke for lunch and to work in our rooms! I was psyched!! I was able to spend almost 4 more hours in my room cleaning and decorating. It's ALMOST done!! I thought I'd share some pictures with you because so many of you have been following my progress and asking me what it looks like now.

 This is my front board. The far left is an empty hundreds chart which we will build together as we count the days in school. The yellow pocket chart under that is my ones, tens, hundreds chart. The next board has my calendar, the "Who's in School?" Pocket chart, and my LOVELY months of the year from Tabitha at Flap Jack Educational Resources. Under that in the square open space is supposed to be my weather board BUT for some reason the glue isn't holding the ribbon on in one spot so it keeps falling. I tried a stronger glue today and left it to dry over night, we'll see if that works! The next board is my Word Wall. I divided it in half (although it don't look exactly in half now that I'm staring at the picture) with yellow duct tape. There are tons of magnets on the tape trying to get it to stick better to the fabric. We will have to see if that works, otherwise I will be breaking out the hot glue gun!! There are sample letters on the board from a while ago that I never took down. I also have my behavior clip chart hanging on the board for absolutely no reason, except that I'm still trying to decide where I'm going to hang it! The chair that's under the boards will be moved. The white wires need to be taped down so the kiddies don't play with them. The shelves with all the colorful baskets will be used for our math centers. 

This is the other side of the carpet right across from my rolling dry erase easel (at the far end of the front boards). This is my math center. I still have to make labels for all of the bins BUT it's a start! I had this great shape poster set that I used blue painters tape and stuck to the window shade.... unfortunately the word "trapezoid" decided to take a vacation... I hope it returns soon otherwise I will have to make a new sign! You can also see the back end of my HUGE printer that prints AMAZINGLY! And my "media" cart that houses the projector for our ELMO system and other electronical equipment.

This is the wall of closets I have in my classroom. I hung my brand new "Handy Helper" classroom jobs chart. I'm going to do something with the kids names on the other door so I can move them in and out of jobs easily. I'm not sure how or what I'm going to do just yet - any suggestions? Next to that is my writing center. The black stacking shelves hold different choices of writing paper. The colored bins will be for their writing folders. The round table will be where I hold conferences. 

This is the side of my room. My library (which isn't set up yet, I know, I know the kids start on Thursday I have to get a move on it!) backs up against my math center. The three colorful shelves hold three different sets of bins. The bottom bins are for our shared reading folders, the next set is for our art journals and the top ones I'm still trying to decide what to use them for. 

I was thinking of creating 4 different binders. One binder for my teacher stuff, one binder for math conferences, one for writing conferences, one for reading conferences, one for ????.... OR my other option was to create one binder for teacher stuff, and then make four binders for the whole class. I would divide my class list into 4 equal parts and put 1/4 of the class in each binder. Any thoughts? Whatever I decide I think I'm going to get each binder to match the color of the bins... wouldn't that look nice?!?!

My final picture for the day is my HUGE green boards. I LOVE THEM!! They are covered in green fabric and I added the pink boarders today! I'm going to use them for first day of school pictures. I wish I could move the phone... but I can't so I will have to think of something to do with that for the pictures, but I bough really pretty letters that I will punch out and write "My 1st Day of Kindergarten!" I think the pictures will look cute!!! 

Tomorrows projects are to cover my last two boards with fabric and hang all the boarders. I also have to finish putting the yellow duct tape on the word wall and need to set up my library. My room is coming together really nicely and I'm excited to see it when it's all done. I have to also figure out where I want to hang my schedule but I have some ideas for that - You'll just have to follow my blog to see what I decide to do!

Don't forget... Only 2 days left to enter to win a custom clipboard! Click here to enter to win a clipboard! Photobucket

Saturday, September 1, 2012

Operation Clean Room - Day 4 and Some Other Stuff

Ok first up - pictures.... I owe you some pictures of my classroom....  As you know I've been working really hard on my classroom. On Thursday I tried something new - I used liquid starch (which I was able to find at Walmart) and fabric to cover my bulletin boards. Check out these before and after shots!


I am LOVING this purple!! It looks soooo pretty. The middle board turned a bit brown unfortunately. Under the fabric is a peg board and, well, let's just say its not exactly new. I'm thinking that I should have primed the board before I put the fabric onto it, but I'm not really sure I'm allowed to paint anything so I just let it be as is. I did hang a few things on it already - my attendance pocket chart, my calendar and my weather board that I made (no I did not get pictures, sorry!)

So those are the before and after shots of my front boards (and you can see the mess is almost gone!) Now check out my two side boards....

Isn't this green fabric AMAZING?!?! It looks like an old school green chalk board! I am in LOVE!!! You can see some of the old tape marks but once the boards are decorated I figure you wont see them any longer! I'm not sure what I'm going to do with this board just yet... but it looks really pretty and I bought really nice pink boarder paper today to finish it off. I also bought some fun letters to write across the board - My 1st Day of Kindergarten.... How cute will the kids look standing in-front of this board for their beginning of the year pictures!

I also remembered to get a picture of my walk in closet:
There are shelves behind the door. Those shelves now house 6 remaining baskets of books and all the extra/duplicate phonics pieces. The shelves that would be right ahead of you if you were walking into the closet are going to be all my art supplies. You can see some small bins on the second shelf down with yellow post-it notes on them - that is the beginning of my organization plan! The shelves to the left are going to be a place to keep all the supplies the kids bring in... now this picture was taken at the end of day 3 and I have to say at the end of day 4 this closet is 3/4 of the way done! I'm super excited, but unfortunately it's crunch time so I have to put my closet renovation/organization on hold so I can get the rest of my room done.

So I have one last "project" to share with you... today I was busy busy busy out doing lots of fun things with my little one, but also getting some supplies and items for my classroom. At one of my many stops today I had to laminate ALL my new stuff...
That my friends is 51 FEET of laminated items that now all need to be cut out... so what are you doing tomorrow? Want to come over and cut out what looks like a million different items?!?!? I do have to say that it only cost me $14 so I'm not complaining, but I wish they had a drop off service so someone else could cut everything out.

Ok my friends I must say goodnight for now... but I promise to post some more fun stuff soon and I have a few items I'm working on for my store that should be done soon!

Don't forget to click HERE and head over to my Back to School giveaway to enter for a chance to win a hand crafted clip board! Photobucket